
Pack your mosquito nets and your anti-venom because we are going to the rainforest—The Amazon Rainforest! We will learn about the layers of the forest, the trees spread across the land, and the animals that live there. We will explore biology, practice math skills, and enjoy making crafts. Our lessons will engage our creativity and our imaginations as we create a full rainforest diorama that will help students bring the entire weeks of activities together. And finally, we will end the week with a sweet chocolate treat! Click here to download and print your skills tracker.
We recommend reading the book The Explorer by Katherine Rundell this week. It’s an exciting novel about a group of kids who must survive in the Amazon after their plane crashes. It’s the perfect companion to a week of learning about the Amazon Rainforest!
What you need:
Books (find at your local library or order below on Amazon):
- Over and Under the Rainforest by Kate Messner (or this read aloud on YouTube)
- All the Way Down: Amazon Rainforest by Alex Woolf
- Chiri The Hummingbird: A Book About Empathy and Kindness by Jo Blake (or listen to this read aloud)
- Wicked Bugs: The Meanest, Deadliest, Grossest Bugs on Earth by Amy Stewart
- (+) How Monkeys Make Chocolate (or read it here on OpenLibrary)
Optional chapter book:
- The Explorer by Katherine Rundell
Supplies (use what you have, but here are links to shop if you need anything):
Note: We break down our supply list so you can choose what you need based on which lessons you plan to do with your child.
Amazon Rainforest model:
- 5 shoe boxes (or shipping boxes of similar size that can be stacked)
- construction paper (you may want extra green paper this week if you don’t already have it)
- hot glue gun + glue
- paper towel rolls
- toilet paper rolls
- crafting supplies, faux greenery, sticks, and any other items your child would like to use to fill out their model
Amazon birds:
Hummingbird pollination activity:
- clear glass cups
- pipettes or straws
- food coloring
- water pitcher (or something similar)
Canopy layer diorama:
- construction paper (blue, brown, and green)
- green tissue paper or faux greenery
- paper towel or toilet paper rolls
- green paint + brushes
- rainforest animal figurines (optional)
- pipe cleaners (optional)
Understory diorama:
- green construction paper
- tissue paper, crepe paper, and/or pipe cleaners
- paper towel or toilet paper rolls
- vine leaves
Orchid craft:
- watercolor paper
- watercolor paint + brushes (or can use watered-down acrylic paint)
- tissue paper
- green construction paper (or green cardstock paper, felt, or craft foam sheets)
- brown construction paper
- green pipe cleaner
- bamboo skewer
- paper cup, pot, or a ceramic mug
Origami tree frog:
Forest floor diorama:
- dark green construction paper (or you can use paint)
- moss, rocks, greenery
- toilet paper or paper towel rolls
Forest floor animals:
- paper + access to a printer (don’t have one? we like this model)
- colored pencils or markers
(-) Tapir raft:
- access to a printer (don’t have one? we like this model)
- white cardstock
- black paint (or crayons)
- googly eye (optional)
Anaconda craft:
- green paper
- glue
- green marker (optional)
Brigadeiro recipe:
Lesson 1:
Rainforests can be found in many parts of the world. They are warm, wet forests in the tropics (close to the equator), and they have rich diversity of life. We talked a little about them in our Peru Unit, but this week we will learn even more.
****Note to parents: If you have younger students learning along with you, look for activities in Level 1: Forest Unit or Level 2: Forest Unit that will support their learning on this same topic as well.
Let’s begin our deep dive into the Amazon Rainforest with a picture book the whole family can enjoy, Over and under the Rainforest. You can also listen to the story here. Read the back section of the book entitled “About the Animals” to learn more about the animals highlighted in the story.
Activity 1: Discover the layers of the rainforest. Review pages 6 and 7 of All The Way Down Amazon Rainforest to introduce the layers of the rainforest. The layers include the emergent layer, canopy, understory and forest floor. We will learn about each layer, one at a time, as well as the animals that inhabit the layer. Finally we will spend some time learning about the Amazon River that flows alongside it.
As we learn about each layer, we will also build a diorama. (We did something similar in our Level 1: Forest Unit, but hopefully now that they are older the diorama will be more detailed.)
To begin our craft, you will need 5 shoe boxes (or shipping boxes) of the same width so that they stack on top of each other. (Alternately, you could use a large box and use scrap pieces of cardboard to divide it up.) Build your stack by attaching all five boxes with duct tape so that they are secure. (Students should work through this activity as quickly or as slowly as they would like.) You can see examples of what your final result might look like here.
We’ll begin by adding the Emergent Layer to our model. Read pages 8-11 of our book to learn about the top layer of our rainforest, then get ready to build. Begin by covering the inside of the box with a light blue colored construction paper. Next, build the tops of tallest trees. These trees as you see in the picture are the tallest trees in the forest but allow light to shine through the layer below. Watch this video (starting at 5:25) to learn more about this layer.
Activity 2: Birds of the rainforest. As we read in pages 10 and 11 and saw in the video, there are many animals that live in this layer of the rainforest, including birds! (You can also see some of these animals here if you don’t have the book.)
One of our favorite birds is the hummingbird! Hummingbirds are among the rainforest’s busiest animals. Flying at the rate of 40 miles an hour, the hummingbird travels from plant to plant, drinking nectar. It needs to fly fast—the high speed of its wings helps to keep the hummingbird safe from predators.
When the hummingbird is taking nectar from plants, it holds its tiny body upright. Its wings may look like they are going up and down, but in fact the wings of the hummingbird beat in a figure-eight motion. This allows the bird to remain near the flower and drink for as long as it takes to get the nectar out of the plant. (source)
The pulse of hummingbird can surpass 1,200 beats per minute—the fastest heart rate of any bird. To sustain this workout, plenty of nourishment is needed. Some white-eared hummingbirds have been found to eat 850 percent of body weight per day, and they must eat every 10 to 15 minutes! When a hummingbird wakes up in the morning, its body must be fed quickly as the bird is almost starved. Hummingbirds “hibernate” during the night, decreasing their metabolism and body temperature to preserve energy. Hummingbirds in the Amazon are frequently seen hovering over flowers and lapping up nectar with their long, hollow tongues, which are forked at the end. They also favor a wide array of insects, including beetles, flying ants, and daddy long legs. (source)
Think about this: If a human burned as much energy as a hummingbird during the course of a day, they would have to eat approximately 370 pounds of potatoes! (source)
Watch this video to see some hummingbird enthusiasts search for hummingbirds in the Amazon. Next, watch this video for some slow motion hummingbird wing flapping. Isn’t it cool?!
Let’s take a character building detour with the children’s book Chiri The Hummingbird: A Book About Empathy and Kindness (or listen to it here). This charming hummingbird-inspired book can help families have gentle conversations about empathy and kindness.
Let’s add some birds to our diorama! Using cardstock paper, draw pictures of the birds we learned about today. (Alternatively you can print this page on cardstock and have your child color in the birds. You can also add feathers, if desired, to make them more realistic.) Finally, attach them to your diorama either gluing them onto the treetops or hanging them on string from the roof of your box.
Activity 3: Discover pollination. Let’s review pollination with this video. Hummingbirds are also pollinators. Read this article to learn about their pollination process and do the straw activity on the same webpage.
Finally, watch this video to see a hummingbird pollinate lilies.
Lesson 2:
Next on our tour of the rainforest is the canopy layer!
Activity 1: The canopy is found below the emergent layer. Read pages 12-13 of Over and under the Rainforest to begin today’s activities. (If you don’t have the book, you can read about the canopy ere.) Next, watch this video starting at 3:55. There is so much going on in this rainforest layer!
Now it’s time to build your canopy layer in your diorama. Begin by pasting a blue construction paper onto the sides of your box. Paint some green leaves on the background to really make this layer look full and lush. Build the tops of trees and the trunks of the taller trees above using your brown construction paper and fill them with leaves you cut out from construction paper, tissue paper, or with faux greenery.
Activity 2: Click the cecropia leaf on this website to learn why the shape of the leaves in the canopy are important. This leaf is hard at work performing photosynthesis and cellular respiration. (We learned about photosynthesis before in Levels 1 + 2 and in the Kenya Unit: Week 2.) Let’s review what this process is in our book on page 13. Next, let’s watch this video to learn a bit more or refresh our memories.
Let’s add one more layer to our knowledge of plants. We learned about plant respiration in this activity in Level 1. Set up this activity to do it again if you haven’t done it in a while. This video will put this all together for us by reviewing photosynthesis but also teach us more about plant respiration. Use this printable to help discuss these processes in review.
Activity 3: Let’s review pages 14-23 of our book to learn about so many of the animals that call this layer home. Begin with pages 14 and 15. It is filled with monkeys! (You can also visit this website to learn more about the Amazon monkey dwellers.) Watch this video to see some spider monkeys glide from trees, eat, and parent their young.
Pages 16 and 17 of our book introduce us to more birds that live in these branches. Pages 18 and 19 will introduce us to mammals that eat the produce of the trees. Pages 20 and 21 are canopy carnivores like the boa constrictor, poison dart frog, and the margay. Pages 22 and 23 are all about tree bugs like the orchid bee, leafcutter ant, and the praying mantis. Once you have finished learning about these animals, add some of them to your diorama. Draw them on cardstock and use mini crafting sticks or string to attach them as we did in the emergent layer. You might have animal figurines (like these) from previous lessons that would make nice additions to the project.
One special group of animals we want to draw your attention to are the deadly ones. The book Wicked Bugs lists many deadly animals that live in the rainforests. Children who enjoy insects will love this book! One of the mist fascinating is the Brazilian wandering spider, also known as the banana spider. Read about them on pages 3-5 of Wicked Bugs. Next, let’s learn more about the Brazilian wandering spider in this video. Be sure to add the spider to your diorama (you can either draw it or make it out of pipe cleaners).
Lesson 3:
Activity 1: Let’s begin learning about our next layer, the understory, by reading pages 24-27 of Under and Over the Rainforest. (You can also use this link if you don’t have the book.) Next, watch this video starting at 2:10. (It is spelled understory in the book and video.) Now, create the next layer of your diorama. This layer is so filled with leaves that you can cover the boxes in green construction paper. Add lots of trees and leaves and vines using paper, crepe paper, or pipe cleaners. In this layer you will also see brightly colored flowers and smaller trees including the banana tree. This layer of your diorama will include trees, leaves, flowers, and vines.
Activity 2: Discover orchids. One flower that thrives in the rainforest is the orchid. There are more than 25,000 kinds of orchids that originally come from rainforests across the world! These stunning flowering plants can grow out of the soil or on top of other plants. Some varieties grow as vines, while others are shrubs. Orchid flowers vary in size from very small to more than 38 cm (15 inches) across. Their size and shape are often adapted to different pollinators.(source) Click here to see examples of pictures of this beautiful flower and the Amazon varieties that exist. Next, this video shows many varieties found in the Amazon rainforest. Finally, watch this beautiful time-lapse video of an orchid blooming.
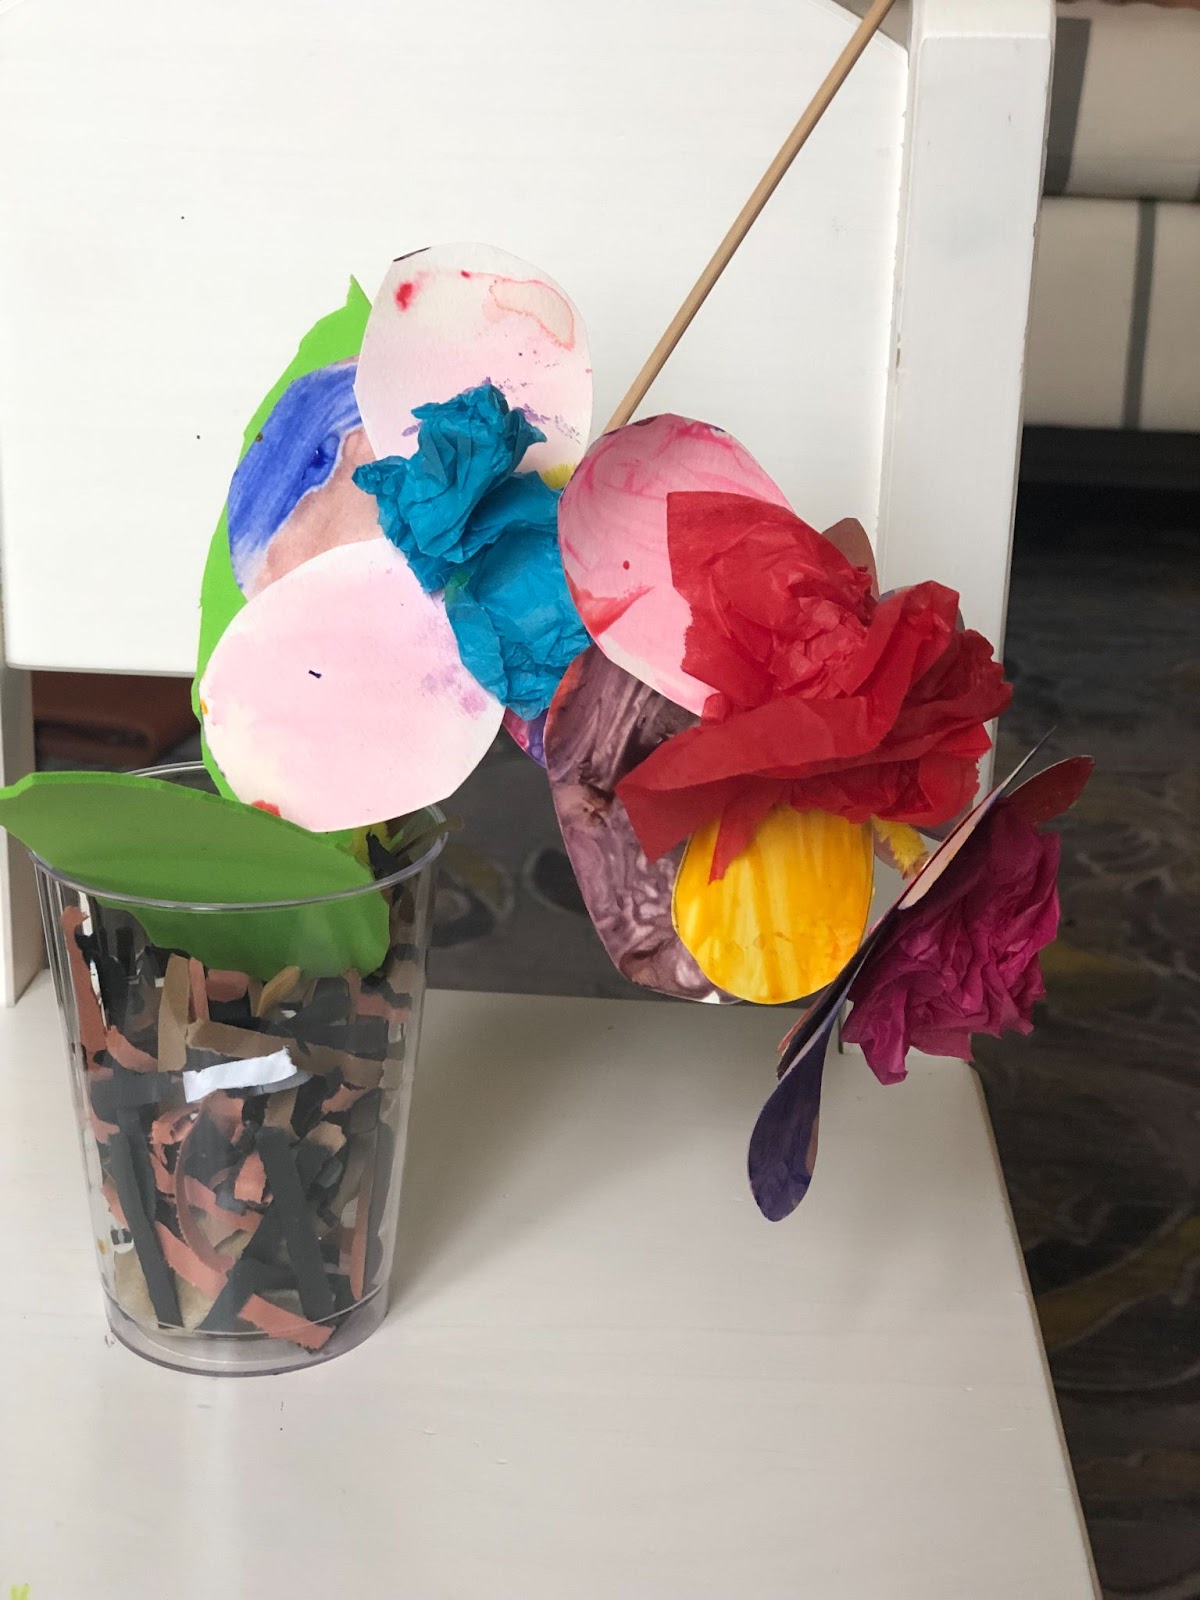
Now, let’s make our own orchid craft!
- Begin by using this template to draw petal shapes onto watercolor paper. (You could also use the printable as is.) Using watercolors or watered-down acrylic paint, add color to the petals you have cut out. The water will cause the paper to curl and create a very natural appearance.
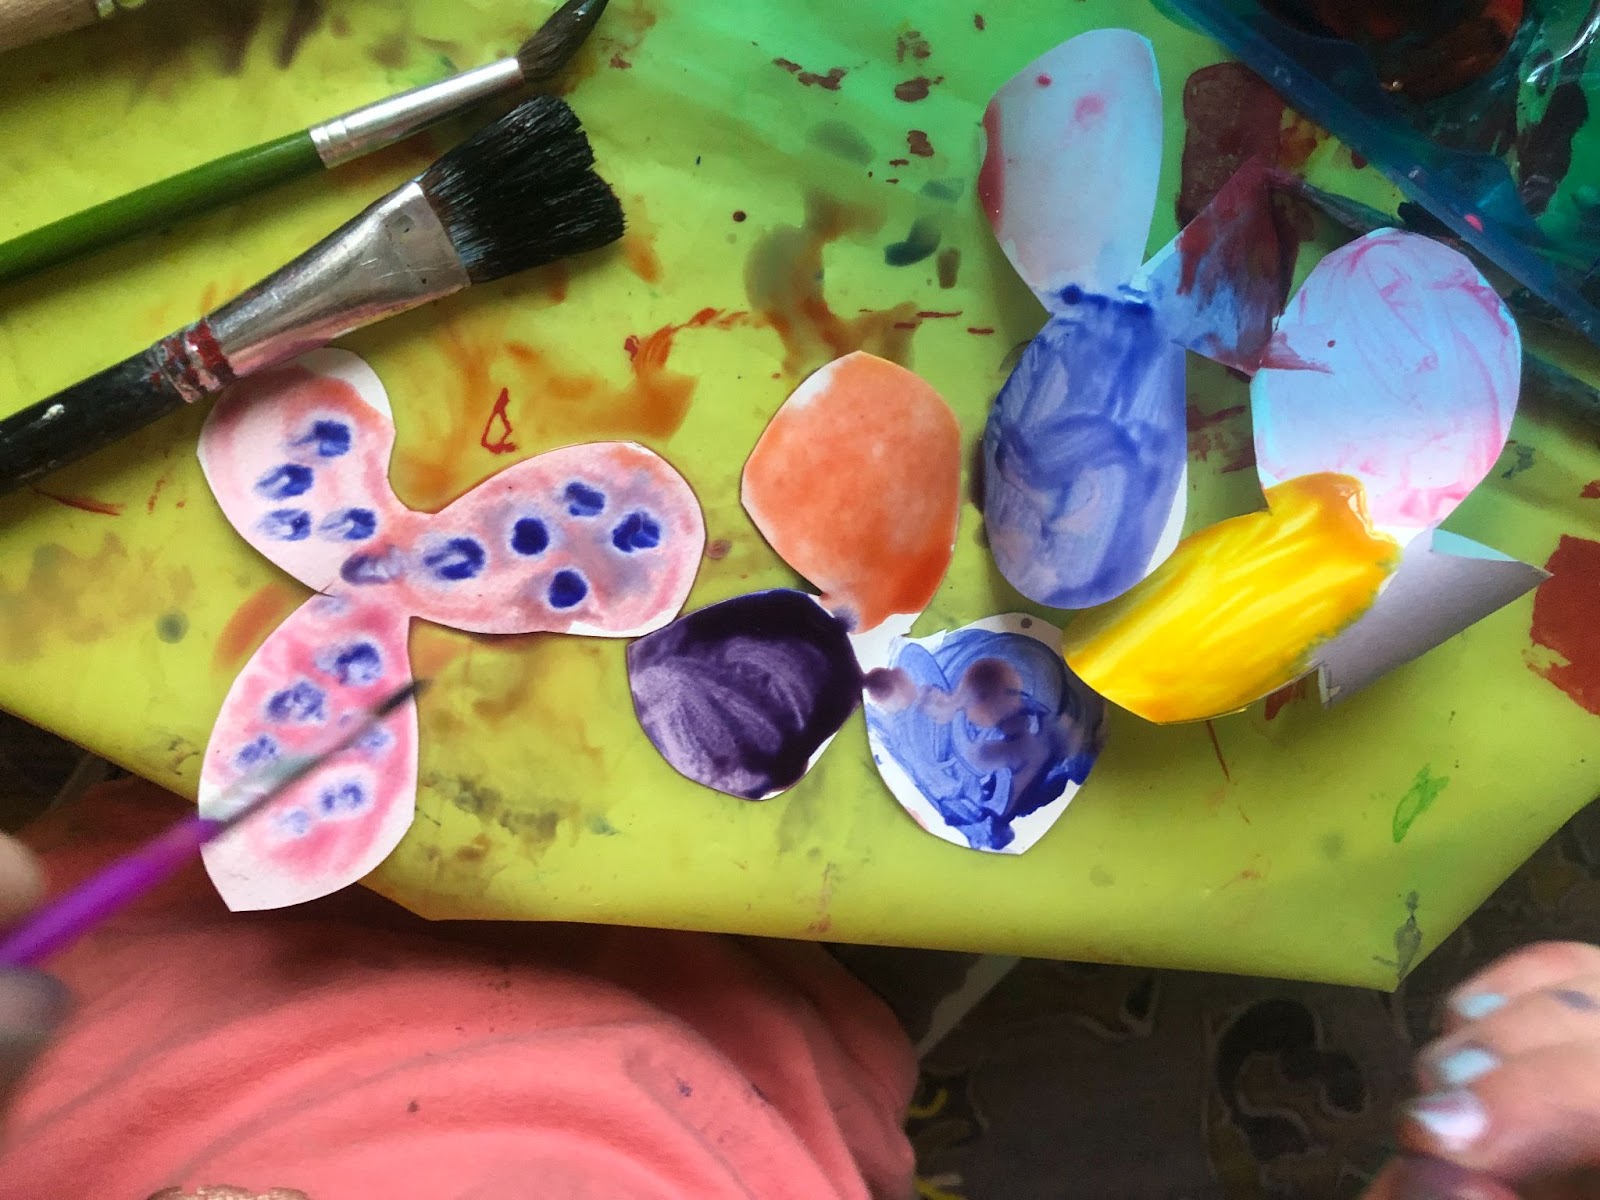
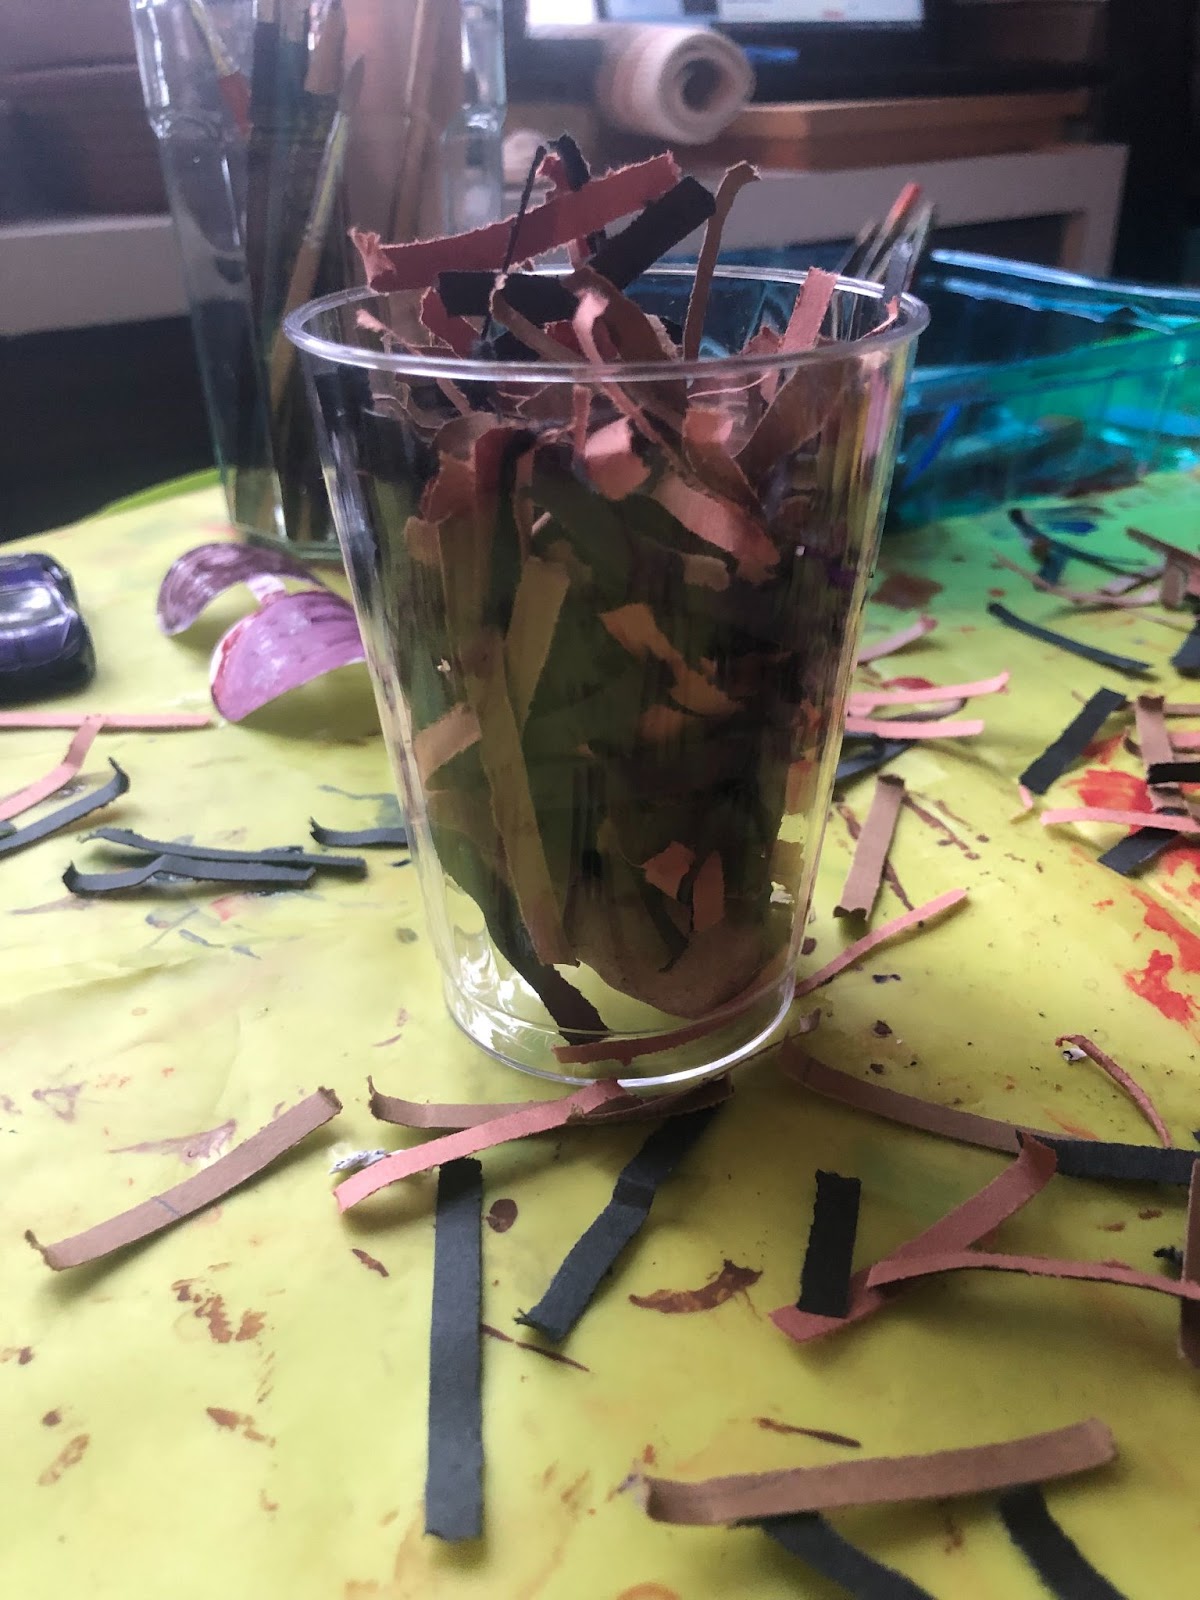
- Place a rock or other heavier object in the bottom of your cup to weigh it down. Next, shred brown and black construction paper using a paper shredder or scissors. Fill your cup halfway with these shreds.
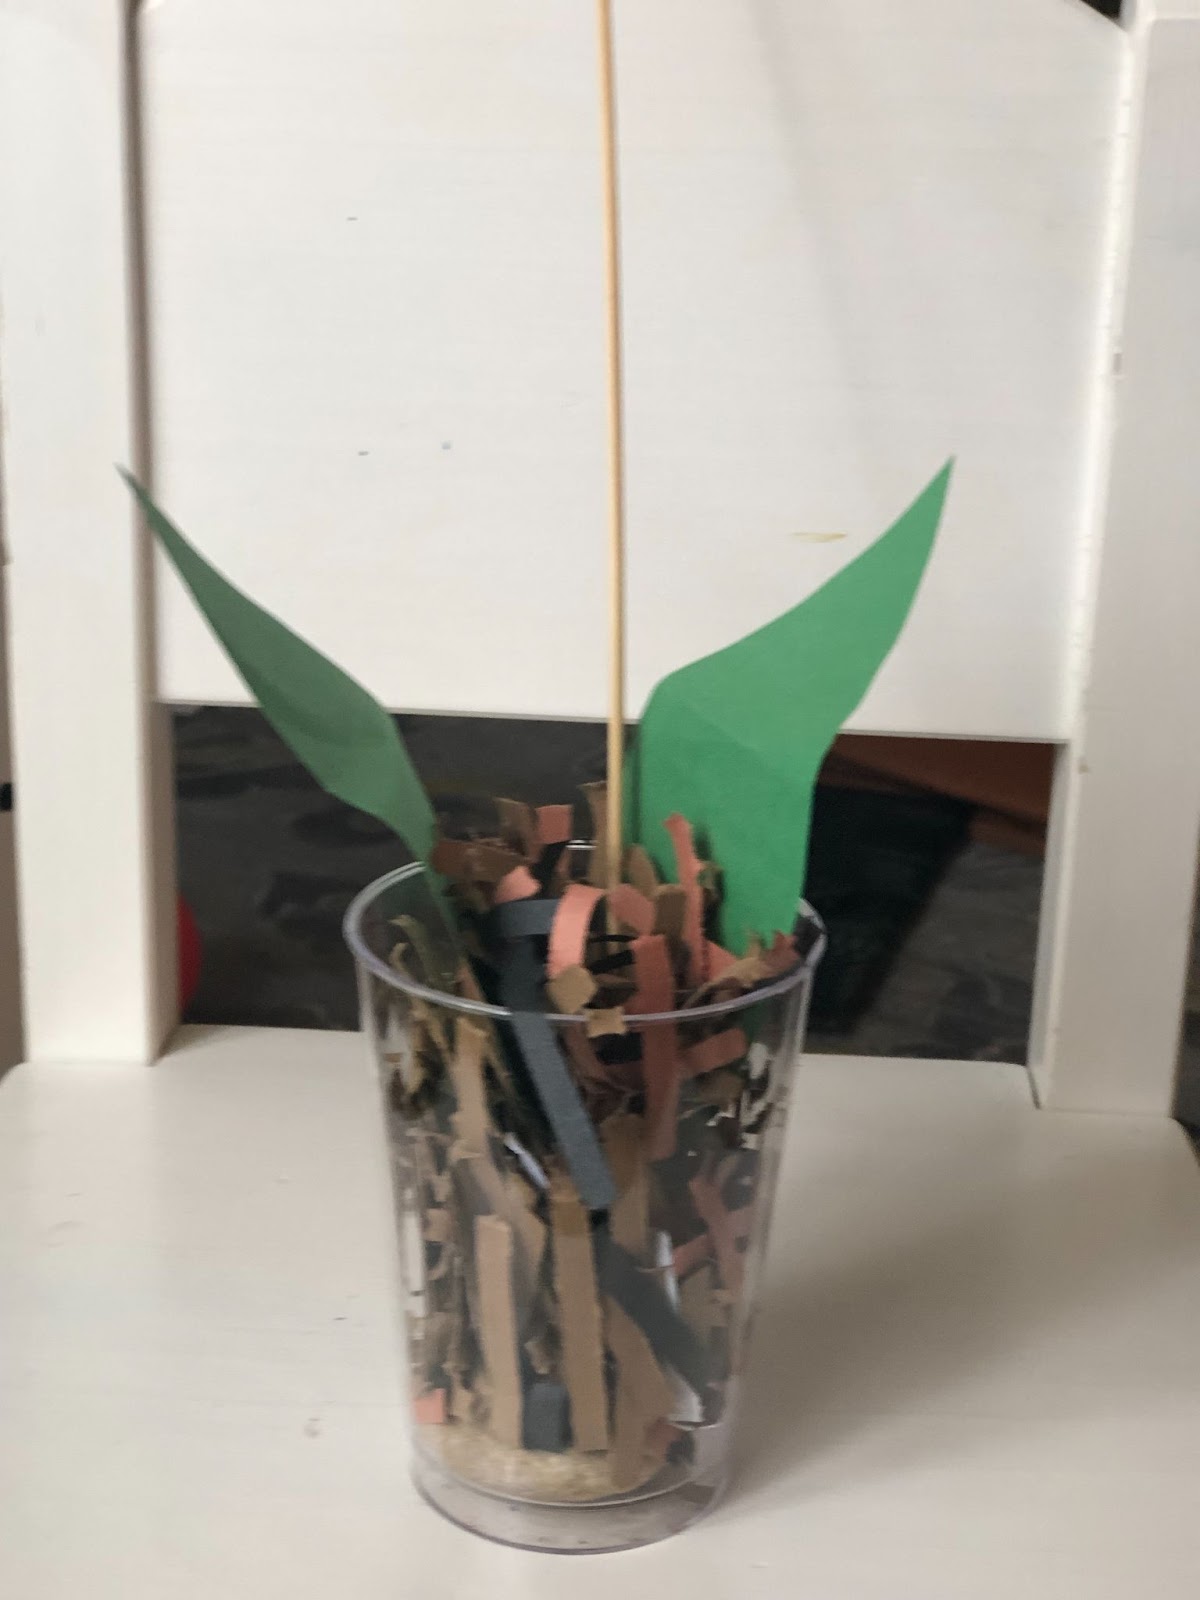
- Cut out a leaf on green construction paper or green foam using this leaf template. Poke through the center with a skewer. Add it to your “pot” by sticking the skewer into the cup. Add more construction paper to fill the cup to the top.
- Once your watercolor petals have dried, use a very small hole puncher or a large sewing needle to poke a hole into the center of the paper. Thread the petals through a pipe cleaner in alternating patterns to create three orchids on each stem. Glue a cluster of wrinkled tissue paper on top of each petal group to form the top of the flower.
- Wrap the pipe cleaner part way around the skewer and create the drooped shape of the orchid stem.
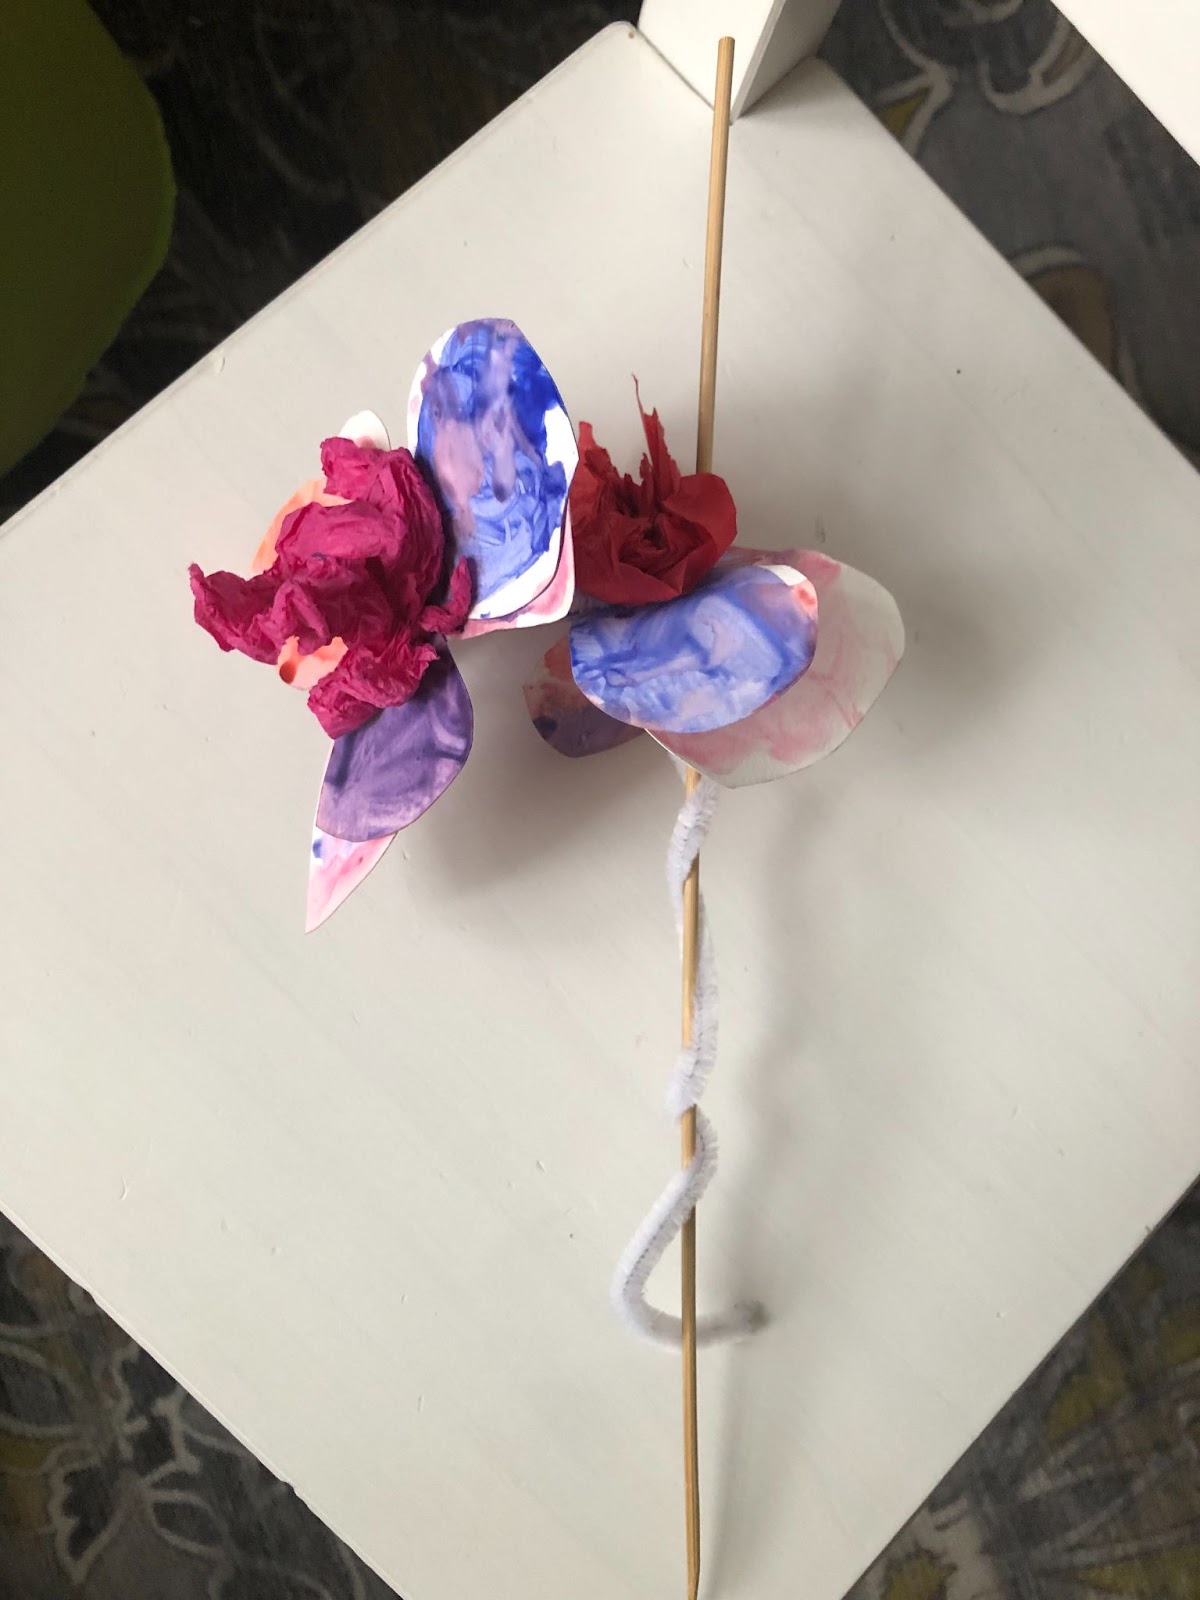
- Put the stick back into the pot
Activity 3: Let’s add some animals to our layer. Review some of the animals on pages 28-29 of Over and Under the Rainforest. Draw a picture of your favorite animal and add it to your diorama.
Let’s take a closer look at the red-eyed tree frog. Begin by reading more about it here. Next, watch this video.
Frogs leap because their tendons are designed with a spring-like action. As the frog readies itself to leap, its calf muscle shortens. After about 100 milliseconds, the calf muscle stops moving, and the energy has been fully loaded into the stretched tendon. At the moment the frog jumps, the tendon, which wraps around the ankle bone, releases its energy, much like a catapult or archer’s bow, causing a very rapid extension of the ankle joint that propels the frog forward. The entire jump—from preparation to leap—lasts about a fifth of a second. (source)
Now, let’s make a math-loving leaping origami frog. Play the multiplication game in that post to add a little math to our lesson.
Lesson 4:
We’ve made our our way through the rainforest to the forest floor! Today’s activities will take closer look at the tropical forest’s ground level.
Activity 1: Read pages 30 and 31 of Under and Over the Rainforest to learn about the bottom layer of our rainforest, the forest floor. (You can also read about it here.) Watch this video to learn more. Next, add this layer to your diorama.
Cover your new box in dark green and add the “trunks” to your trees using paper towel or toilet paper rolls. You can also add vines and small bushes, moss, leaves, and rocks along the bottom of the box. Include a tree or two that has fallen to the ground as well.
Activity 2: Read pages 32-35 of the book to learn about the animals that live on the forest floor. Print out these pages of animals. Color them in, cut them out and place them into your diorama. (Or, for the ants, you could make dots on one of your “trees” with a permanent marker.) Alternatively, your child may enjoy drawing their own animals.
Let’s take a closer look at the South American Tapir. Read this webpage to learn about this animal. Then, watch this video to learn more about the tapir. This video shows more footage of a Brazilian tapir. How would you describe this animal? As you watch the video, make a list of the characteristics you observe. Does it remind you of other animals? Now look at this video of a baby tapir. Isn’t he cute??
(-) Want a simple way to bring the tapir to life? Create this tapir craft.
Activity 3: The final layer of our diorama will be the Amazon River. We learned a little about the Amazon River last week when we created our edible map, but let’s read the final pages of our book to learn a bit more about this special ecosystem and the animals that live there. Read pages 36-43 of Under and Over the Rainforest.
Let’s learn more about one of Brazil’s famous forest floor dwellers—the green anaconda! Click here to read more about it. Next, let’s do an anaconda craft.
1) Print out this printable on colored green paper or color it in using markers. We are going to create a paper chain anaconda. (There are extra strip pieces to make your own designs.)
2) Cut out the top and tummy links out and place in one pile. Place the side links in a separate pile. Cut the head and tail out and save for last.
3) To make the body create a paper chain alternating one top and tummy link with each side link. When gluing the top and tummy, place the glued end on the underside, when gluing the side links place it at the back. This keeps the pattern consistent.
4) Color the eye and tongue, then glue onto the head. Fold the tab on the head, and glue into place at one end of the chain. Do the same with the tail.
It’s hard to see how big the anaconda really is unless you see it in relation to other big things. Check this website and its embedded video to be blown away!
Lesson 5:
For our final day of activities this week, we’ll be learning more about the Amazon River and what is likely one of your favorite foods—chocolate!
Activity 1: The last layer of our diorama includes everything that goes on under the forest floor, including water from the Amazon River and the root system for all the trees above. Read pages 36-38 of Under and Over the Rainforest to learn about the river. (Or you can read about it here .) Next, read pages 38-43 to learn about the mammals, reptiles, and rivers that live on top and under the river. Complete your diorama with the final box displaying the root system for the trees above and the water from the river below. (You can see an example in the bottom box of this picture.) Draw pictures of the pink river dolphin and the Amazonian manatee and add them to your diorama.
Can you imagine surfing the Amazon River? Watch this video to see it happens!
Activity 2: One important plant that many of us have come to love from Brazil is the cacao plant. The cacao tree is a small tree originally grown in tropical South America. It only grows to 4 to 8 meters in height. Its seeds are called cocoa and are used to produce cocoa butter, chocolate drinks, and chocolate.(source)
Let’s use a few lesson ideas from the San Diego Museum of Natural History! Print pages 13, 14, 23, 25, 40 from this printable from their website. (Note: There are dozens of lessons in this PDF. We have chosen a few for you, but feel free to do as many as you think your children will enjoy. Families homeschooling in Spanish can also print the Spanish language worksheet pages, if desired.)
Begin by reading pages 13 and 14 to learn about the cacao plant and how monkeys help disperse the seeds throughout the forest. Give your child the coloring sheet (page 40) to color in while you read to them.
(+) For extra reading and more pictures of this process, read the book How Monkeys Make Chocolate (or read it here on OpenLibrary) pages 8-17. Once you have completed the reading, review the information using the worksheet (page 23) where students will draw and describe the cacao plant and how it is cultivated. Finally, do the writing assignment on page 25.
Activity 3: After completing Activity 2, you are probably craving some chocolate. Get ready for a treat! One very special Brazilian chocolate dessert that many enjoy is the brigadeiro. Brigadeiro are chocolate truffles made with condensed milk and covered in chocolate sprinkles. (The traditional brigadeiro is made with milk chocolate, but there are also white chocolate versions available, too.) Prepare this brigadeiro recipe.
***Post contains affiliate links. If you make a purchase through a link, we may receive a small commission at no cost to you. Thank you for supporting our small business!***