
Our next stop in English history is the Victorian Era (although we will be skipping about a bit this week!). This week we will learn about a special Queen who sat on the English throne, brilliant writers who many of us still enjoy reading (or watching) today, and the great impact of the science minds of this time in history. Ready to get started? Click here to download this week’s skills tracker.
What you need:
Books (find at your local library or order below on Amazon):
- A Boy Called Dickens by Deborah Hopkins
- You Wouldn’t Want to be a Victorian Servant (or read it here on OpenLibrary)
- Who Invented the Light Bulb?: Edison vs. Swan by Susan E. Hamen
- Isaac Newton and the Laws of Motion (Inventions and Discovery) by Andrea Gianopoulos (or read it here on Open Library)
- Honest History – The Era Of Exploration – Issue Nine (use code LEARNANDLIVE15 for 15% off your purchase!)
Pick from one of the following for Week 3, Lesson 1, Activity 1:
- The Adventures of Sherlock Holmes by Arthur Conan Doyle (or read it here on Open Library)
- The Sherlock Holmes Children’s Collection: Shadows, Secrets and Stolen Treasure Box Set
Optional additional reading:
- Street Child by Berlie Doherty (or read it here on OpenLibrary.)
- Solve It With Sherlock Holmes by Gareth Moore
- At Her Majesty’s Request: An African Princess in Victorian England by Walter Dean Myers (or read it here on OpenLibrary)
- You Wouldn’t Want to be a Victorian Schoolchild by John Malam (or read it here on OpenLibrary)
- The Best Book of Trains by Richard Balkwill (or read it here on OpenLibrary.)
- The Story of Buildings by Patrick Dillon
Supplies (use what you have, but here are links to shop if you need anything):
Note: We break down our supply list so you can choose what you need based on which lessons you plan to do with your child.
DIY telescope:
- 2 magnifying glasses, one with a handle and one without a handle
- measuring tape
- box cutter
- tissue paper (optional)
- 2 cardboard tubes, diameter wider than the lens on the magnifying glass with a handle (check your post office for shipping tubes)
- duct tape
- hot glue gun + glue
- 3 36-inch wooden dowels or sticks
- string
- decorative materials, such as stickers, paint, markers, or colored tape (optional)
DIY oil paints:
- bowls or jars to hold paint
- strainer or cheese cloth
- paint brush
- watercolor paper or cardstock
- mortar and pestle (or a sturdy bowl and salt or pepper shaker as a substitute)
- variety of vegetables and fruit for color, such as spinach, raspberries, turmeric powder, paprika, canned beets, instant coffee or cocoa powder, and red cabbage
Tudor home model:
- cardboard boxes (shipping boxes or tissues boxes for the structure of the house)
- cardstock
- hot glue gun + glue
- ruler
- white paint
- paint brush
- black marker
- black, brown, white, and gray foam sheets
Victorian embroidery craft:
Addressing an envelope:
- envelope
- stamps (find these at the post office or some grocery or drug stores)
DIY fire extinguisher:
- small tea light candles (these might be cheaper at a local store)
- baking soda
- vinegar
- matches
- a funnel
- a bottle or pitcher with a lid
DIY lightbulb:
- glass jar with lid
- hammer
- 1-inch nails
- three feet insulated copper wire
- 6-volt battery
- a few inches of iron wire
- electrical tape
- wire cutters
English trifle recipe:
Hand washing experiment:
- 3 slices of bread
- 3 sandwich-sized plastic bags
- permanent marker
Optional Gameschooling:
Ticket to Ride United Kingdom Board Game Expansion
What to do:
We recommend doing the below lessons in this order to build on each skill your child will develop, but don’t feel that you *need* to do them in this order. Do what works for you and your child. If they love an activity, feel free to repeat! Not a winner? Skip and try the next thing. Have fun!
Lesson 1:
There are many famous people from England, Scotland, and Ireland. We are going to jump around our timeline as we learn about three of them. Please include their births or impactful dates on your timeline!
Activity 1: Discover Arthur Conan Doyle. Let’s learn a little about Doyle and his impact on literature. Read about him here or watch this video.
As we read and saw in the above link, Doyle invented the world’s greatest detective, Sherlock Holmes, and his faithful friend, Dr. John Watson. The Adventures of Sherlock Holmes by Arthur Conan Doyle is great for young readers. Another option is The Sherlock Holmes Children’s Collection: Shadows, Secrets and Stolen Treasure . Your local library may also have other versions. These stories are short, so you would likely be able to read at least one complete mystery today.
Do you want to try to solve puzzles just like Sherlock Holmes? Try this decoding exercise to send and read secret messages.
Want more challenging activities? Try puzzle book Solve It With Sherlock Holmes: Crack the puzzles to solve thrilling mysteries by Gareth Moore.
Family movie night suggestion: Don’t miss the Netflix movie about Sherlock’s younger sister, Enola.
Activity 2: One of England’s most famous scientists is Isaac Newton. Read about him in Honest History page 46. Did you notice that his education was paused because of a pandemic? But look at all he was able to accomplish! He also invented the reflecting telescope. Learn more and see Newton’s invention in this video.
Next, let’s make our own DIY telescope with this tutorial.
For more reading about Isaac Newton, try the graphic novel chapter book Isaac Newton and the Laws of Motion.
Activity 3: Next, let’s learn about Sir James Matthew Barrie. J.M. Barrie was a Scottish novelist and playwright, best remembered today as the creator of Peter Pan. He was born and educated in Scotland but moved to London, where he wrote a number of successful novels and plays. There, he met the Llewelyn Davies boys, who inspired him to write about a baby boy who has magical adventures in Kensington Gardens (included in The Little White Bird), then to write Peter Pan, or The Boy Who Wouldn’t Grow Up, a “fairy play” about an ageless boy and an ordinary girl named Wendy who have adventures in the fantasy setting of Neverland.
If you’re looking for anther family movie night suggestion, try the movie Finding Neverland.
Activity 4: Another famous writer from England is Charles Dickens. Read the book, A Boy Called Dickens by Deborah Hopkins to learn about his life. Learn about his youth and later life in this video.
Dickens wrote a children’s book called The Magic Fishbone. His other works were meant for adults, but many of his stories have been adapted for younger readers. Want to read a Dickens adaptation? Try Oliver Twist by Lester M. Schulman or Classic Starts: Great Expectations by Deanna McFadden.
As you saw in the video about Dickens’ life, he spent some of his adult life writing for a newspaper. Today, that job is called journalism. Journalists can be writers or broadcasters. Watch this video to learn more about a radio broadcasting career.
Are you curious about things? Do you have causes you care about or think there is an important story that others should know about? You should try your hand at journalism!
If you are curious about something going on in the world, do some research and put together an article. Here are some tips to getting started:
- Choose a topic to research. This may also include interviewing people in your home or community.
- Write an engaging lead. In other words, get people’s attention in the first sentence or paragraph so that a reader will want to read your entire article. You can do this by asking questions or presenting surprising facts and figures.
- Organize your article and write a draft.
- Submit to your editor (a parent counts!) for feedback.
For more help on writing newspaper articles, read this post.
Want to learn about being a sports broadcaster? Watch this video. If you have ever watched sports broadcasting, you know that reporters must do a lot of research before going on air. They have to know about the game, the athletes, and their stories. They also have to understand statistics and ratings (that’s math!). Effective communication is essential because they have to read off of a teleprompter and express themselves with feeling.
For our final activity today, try pretending you are a sideline broadcaster just like the kids in the video. You can choose to report on any sport (or e-sport) that you enjoy. Pretend to report on a game or on an interview you did with a player or a coach. Your broadcast should be 60 seconds long. This project will require research and practice! Film yourself and edit as needed until you have a final clip.
Lesson 2:
Activity 1: Artist study. The Renaissance hit England late, so you won’t actually find many English artists from this time. Most of the popular artists of this time come from Italy, France, the Netherlands, and Holland. Learn about this artistic period in this video. It highlights Italy’s works, but also the principles in art apply to our lesson today.
Around this time period, artists started to paint more realistically. There was more emphasis on the composition of a picture, or the balance of the objects on the canvas. Artists used oil-based paint that allowed them to create a more realistic look in their works
Let’s look at English artist William Hogarth and some of his work in realism. Look at his self-portrait that includes his pug. What do you notice about the picture? Does it look realistic? Look closely at the eyes. Don’t they look like they are staring right at you? Do you see where the artist was heavier with this paint? (Maybe around the dog’s ear?)
Artists often made their own paints using plant minerals to create colors. Read more about that here. An artist from Holland named Jan Van Eyck even changed how artists used oil paint. “Until van Eyck’s time, oil paints dried too slowly, if at all, and were murky and yellow. Van Eyck mixed raw pigment powder with organic oils, boiling calcined bones in linseed oil of the flax plant. This was a breakthrough because it finally perfected a stable mixture that ‘dried’ in a useful time. (Actually, strictly speaking, oil paint does not dry, or evaporate, like watercolour, rather it oxidises and ‘sets’)”. (source) Read about him in Honest History page 14.
Next, make your own paints using oils and egg yolks with the activity in Honest History pages 62 and 63. (If you weren’t able to get the magazine, you can use one of these recipes.)
Activity 2: A popular trend developed during the Turdors was miniature portraits. Lucas Horenbout was Flemish and first invented the technique of portrait miniatures, but British artists refined it. This was done by taking the technique of the illuminated manuscript and transferring this to a miniature portrait that people could wear in lockets. (source) Take a look at some of these beautiful examples.
Let’s learn about Levina Teerlinc, a Flemish-born miniaturist who was a highly-paid member of the Tudor court. Monarchs Henry VIII, Edward VI, Mary Tudor, and Elizabeth I commissioned works, including miniatures, from her. (source) Her presence at court as an artist was not unique, but since the art world was male-dominated and the historians writing the history were usually men, they often chose other men to put in their canon of artists. Art by women was often overlooked or considered as an exception, and thus was more likely to fall into obscurity, disrepair, or museum storage. In some cases, art by an under-appreciated female artist was even attributed to a better-known male artist. (source) Click here to learn about more female artists of the European Renaissance.
Critical thinking. This would be a great opportunity for a family discussion about the treatment of women in the UK (and in your homeland) then and now. Should women be given equal rights to men in society? Should they be treated differently? The rights of women in the UK have developed over time. Click here for a series of videos to add to your discussion.
Activity 3: Learn about the tudor homes built in England in this video. (It’s a bit long, so just watch for as long as your child has the interest.) Then, make a tudor home out of cardboard boxes and paper. This post and this link show images of what your finished product could look like. For directions, click here. Before you begin, use pencil and paper to sketch out your tudor home design. Then, make your design come to life by building a 3D model.
We linked to some optional supplies above, but feel free to use what you have to make your Tudor home unique to your child and their ideas.
Lesson 3:
Today, we’ll be focusing our learning on Victorian England in the 1800s. Be sure to add details to your timeline as you learn about new people and events in this period of history.
Activity 1: Start by reading the book You Wouldn’t Want to be a Victorian Servant. Next, learn about life in Victorian England in this video. There is a writing assignment at the end of the video comparing life for the poor and life for the rich—we will do a modified version of this assignment. To make our writing a bit more fun, try one of these ideas:
- Write a letter from the perspective of a servant telling your family what it is like living in the “big house.”
- Write a letter from the perspective of the Lord or Lady telling your friend about the injustice against the poor that you witness daily.
- Write a letter from the perspective of a servant complaining to your Lord or Lady about your job.
- Write a job description for a servant. (This article will help you know what to include!)
Activity 2: Embroidery was very popular during Victorian England in the late 1800s into the early 1900s. Like the Victorians themselves, Victorian embroidery and sewing was about both function and form—as a result, it was both plain and fancy. Watch this video to see some antique embroidery and learn more about this art form.
Want to try it yourself? This kit can help.
Activity 3: Discover Queen Victoria and King Albert. Get a brief summary about Queen Victoria in this video. Next, we’ll do the family tree activity suggested at the end of the video. Our royal family tree will begin with the parents of Queen Victoria and go to King Charles III today. Each branch of the tree should include the person’s name, birth date, and death date (if applicable). This website can get you started, but feel free to extend the tree to fill it in further. You can also include photos to add more color to your royal family tree.
Prince Albert was fascinated by the new way of making things and saw how rich Britain was becoming as a result. Because of this he and the Queen decided to hold a great exhibition to display the fabulous things that were being made in British factories. Read more about the exhibition and the glass structure that housed them – The Crystal Palace. (Read and see the pictures in The Story of Buildings pages 62-65.)
Optional reading: Read about Queen Victoria in the book V&A Introduces: Queen Victoria to learn about this monarch and her impact on England and the world.
Additional reading: Read the book, At Her Majesty’s Request: An African Princess in Victorian England to learn more about a lesser-known character with a fascinating story from this time period.
Activity 4: As we discussed in the previous activity, Victorian times also brought many new inventions. Let’s learn about one of them! Begin by reading about the Uniform Penny Post here. Next, watch this video and play along with the game Victorian or Not? (End the video at about 6:00.)
One particular Victorian invention that we continue to use today is the postage stamp!
Prior to its invention, the cost of posting a letter had risen steadily over the years. In 1680, a merchant named William Dockwra organized the London Penny Post, which delivered mail anywhere in London for a penny. He also introduced the practice of postmarking letters to indicate when and where they had been posted. The system became so successful that the government took control of the operation in 1682 and absorbed it into the post office. From then on the charges gradually increased.
Successive governments had used the profits from the postal service as revenue to finance the almost continuous wars with France. Each time more money was needed, the cost of postage was increased. Eventually, to send a letter from Edinburgh to London cost as much as a day’s wages! This led to increasing public dissatisfaction and criticism of the high postage rates. As a result of the public complaints, a Committee of Enquiry was set up in 1835.(source)
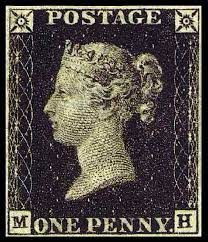
“This stamp, known as the Penny Black, was the world’s first postage stamp. Before the postal reforms of 1840, sending a letter was expensive. The charge was for each sheet of paper that a letter comprised and for the distance covered. The receiver had to pay and not the sender! So a letter of two pages traveling one hundred miles would cost 18 pence or one shilling and six pence. From 1840, the same letter (if it weighed under half an ounce) cost the sender just one penny. The introduction of uniform penny postage resulted in increased trade and prosperity, with more people sending letters, postcards, and Christmas cards than ever before.” (source)
Did you know that The United States Post Office allows you to make custom postage stamps from your own photos? You must use one of the organization’s approved third-party vendors. As explained on the U.S.P.S. website, custom stamps can be designed and purchased from PhotoStamps, PictureItPostage, and Zazzle.
Learning how to address an envelope properly is an essential life skill. Watch this video to learn how. Practice the skill by writing a letter to a friend, pen pal, or family member. Then, stuff the letter into your addressed envelope—and don’t forget to stamp it!
Activity 5: Learn about the life of children during Victorian times in this video.
Looking for a chapter book about this topic? Read Street Child by Berlie Doherty or this series by Jacqueline Wilson called Hetty Feathers. If your child enjoys the books, see if you are able to stream the show Hetty Feather. (It might only be available in the UK and Canada. We weren’t able to find a US DVD version either unfortunately.) You might also enjoy watching this Hetty Feather Broadway version available on Amazon Prime for rent.
Additional reading this week could also include the book You Wouldn’t Want to be a Victorian School Child.
Lesson 4:
Let’s learn about a few more scientific inventions made between 1600 and 1900. We’ll start by watching this video about inventions. Take note of the video’s mention of the inventions of the steam engine and the lightbulb. Be sure to add these inventions to your timeline.
Activity 1: Discover The Steam Engine. The first practical patent for an atmospheric pressure steam engine was filed by Thomas Savery in 1698. Learn about his invention and design here. Watch the video embedded in this link for a more detailed explanation of the steam engine he invented and how it was improved upon for the next hundred years. (For more on trains read the book The Best Book of Trains by Richard Balkwill. It highlights the evolution of train technology and a beautiful picture of Paddington Station.)
We love playing the board game Ticket to Ride! Use the expansion kit Ticket to Ride United Kingdom (added on to either the original board game or Ticket to Ride Europe) to learn about the UK’s railway.
Activity 2: Discover fire extinguishers. The first fire extinguisher ever patented was in 1723 by English chemist Ambrose Godfrey. Fire extinguishing hadn’t advance much beyond pumps and bucket brigades until 1723, when Godfrey patented an explosive alternative. His invention used a cask of fire-suppressing liquid that was released by the blast of a pewter chamber full of gunpowder. Besides scattering the liquid, the explosion probably helped blow out the fire, just like puffing out a candle. Godfrey’s device was successfully used to put out a London fire in 1729. (source)
This fire extinguisher, however, had a limited effect. The world would have to wait until 1818 for British Captain William Manby to invent the modern fire extinguisher. His extinguisher consisted of a 13.6-liter copper vessel of a pearl ash solution (potassium carbonate) contained within compressed air.
There are several types of fire extinguishers, just as there are different types of fires. Each of them put out fires in different ways. Some of them smother the fire, and one to do this is with carbon dioxide. This type is usually used with electrical fires. The extinguishers release carbon dioxide into the air, diluting the oxygen and causing the fire to burn itself out quickly.
Let’s try this for yourself with some science experiments! Do both experiments in this link. The first one is very simple, but it sets up the second experiment.
Activity 3: Discover the lightbulb. Have you ever heard of Joseph Swan? You surely know of his invention: the lightbulb! If you live in North America, you might have thought Thomas Edison invented the lightbulb, but it has actually been a long debate. Read about it in the book Who Invented the Light Bulb?: Edison vs. Swan by Susan E. Hamen. Next, make your own lightbulb at home with this easy STEM activity.
Want to learn about some more inventions? Don’t miss our Level 2+ Inventions Unit!
Lesson 5:
English food during the Victorian era was full of variety. That’s because the poor ate really creative things, and the middle and wealthy class enjoyed delicious foods.
Activity 1: First, let’s learn about the foods eaten by the people during the Victorian era.
“Rich and poor Victorians ate quite different food. Rich children would have eaten very well with lots of choice. For poorer children, there would have been fewer options. Farmers tended to eat better with a diet of meat, vegetables, and fresh milk. Popular foods included beef, mutton, port, bacon, cheese, eggs, bread, potatoes, rice, porridge oats, milk, vegetables, flour, sugar, treacle, jam, and tea. Breakfast might consist of stone ground bread smeared with dripping, or lard, with a large bunch of watercress.
There were plenty of cheap, seasonal vegetables to be found in the markets, including onions, cabbage, leeks, carrots, and turnips. The main fruits were apples in the winter and cherries in the summer. The Victorians also ate lots of nuts, such as chestnuts and hazelnuts, which were often roasted and bought from street-corner sellers. Meat was relatively expensive.
If you lived near the sea, you would probably have eaten a lot of fish. Herrings, sprats, eels, oysters, mussels, cockles, and whelks were all popular, as were cod and haddock. For fresh food, you would have to eat vegetables that were in season (growing at that time), unless they had been pickled or preserved. With the invention of the railways and steamships, food was moved around the country more easily and imported from other countries. This meant that there was a wider range of food available.
Tinned meat was available from the 1860s. At first, this was mainly fat with just a few chunks of meat. It was a cheaper option for poorer people as it was less than half the price of ordinary meat. By the late 1800s, there was a wide range of tinned food available. You could also buy lots of unusual foods from stalls in the street. These included rice milk, ginger beer, and sheep trotters.” (source)
One thing people were very good at was not letting food go to waste. For example, stale bread often made its way into meals like bread pudding.
Innovations in technology also changed how the food that was prepared. Read this article to learn how innovations like the gas stove, mechanical peelers, potato mashers, and even a type of icebox encouraged Victorians to become ever more creative, experimental, and complex in their home recipes.
Next, let’s prepare one of our favorite English desserts, an English trifle. You’ll want this treat for our next activity.
Activity 2: A practice that people still enjoy today also began during Victoria era: afternoon tea. Afternoon tea was introduced in England by Anna, the seventh Duchess of Bedford, in the year 1840. The Duchess would become hungry around four o’clock in the afternoon, but the evening meal in her household was served fashionably late at eight o’clock. This left a long period of time between lunch and dinner. The Duchess asked that a tray of tea, bread and butter (some time earlier, the Earl of Sandwich had had the idea of putting a filling between two slices of bread), and cake be brought to her room during the late afternoon. This became a habit of hers, and she began inviting friends to join her. (source)
Let’s learn about some of the etiquette around proper tea time here.
Next, enjoy our version of this tradition with some Tea + Poetry! Serve your English trifle and tea (or your beverage of choice) while reading English poems, limericks, or children’s short stories that originate from the UK. We have found a few suggestions here and here. Alternately, use this as a read aloud time for one of your chapter books or a picture book from this month’s lessons.
Activity 3: When we think of food, we often think of healthy food preparations. One big breakthrough during Victorian times was the discovery of food- and water-borne illness.
Read this excerpt to learn more:
“Infectious diseases were the greatest cause of Victorian mortality. Most of these, such as smallpox, tuberculosis, and influenza, were old scourges, but in 1831, Britain suffered its first epidemic of cholera. Slowly it was understood that it was spread by water contaminated by sewage.
The impact of cholera and the work of campaigners for public health led in 1848 to the creation of local boards of health, with powers to enforce regulations for clean water supplies and better drainage. Further legislation in the 1870s gave local authorities wider powers to combat insanitary urban living conditions.” (source)
So, we can’t make a cholera lesson hands-on. (For good reason!) But what we can take away from this lesson is the importance of washing your hands. Let’s do a germ experiment over the next few days to what happens when we don’t wash our hands.
To begin, get three sandwich-sized plastic bags that seal and label each one “Control,” “Dirty,” or “Clean.”
Put one slice of bread into the Control bag. (Use a clean utensil to handle it so as not to contaminate the bread.)
Next, touch the second slice of bread with unwashed hands, rubbing the backs and fronts of hands on the bread. Put the bread into the bag labeled “Dirty.”
Finally, have your child wash their hands for 30 seconds with soap and warm water and dry completely. Have them touch the bread in the same way as before and seal it in the bag labeled “clean”.
(Note on properly washing hands: This step is actually really important. Mold is a fungi, so it will grow on moisture. If you touch the bread with wet hands, it will probably make your mold grow faster and send the wrong message to your child.)
Discuss what you child thinks they will observe. Record what they tell you on a piece of paper, and keep it with your experiment.
This experiment will take about a week to complete, but after a few days you will see a little mold emerge. By a week in, you will see a lot of mold starting to grow!
Compare your child’s hypothesis with what actually happened. Was it so much grosser than they thought it would be? This experiment is a great reminder on why it’s important to wash your hands prior to eating!
***Post contains affiliate links. If you make a purchase through a link, we may receive a small commission at no cost to you. Thank you for supporting our small business!***